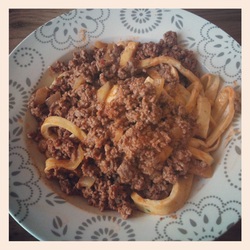
 LCHF "Pasta" So, as you know, eating LCHF means no pasta. Well, this dish allows you to feel like you're eating pasta but without the carb! I found this particular pasta recipe Expressen's Allt om LCHF (Maj 7-11 2012). It's on page 36 and part of the recipe LCHF-pasta med pesto och kycklingspett (LCHF Pasta with pesto and chicken skewers). The original recipe is in Swedish but I'll post it on here translated into English.
My husband thought it was a good replacement for pasta. It is admittedly a bit fiddlesome, so I reckon you wouldn't make it every day, however on those days when you're really missing spaghetti bolognese, it can be worth the effort rather than giving in to the carb monster. Things I would probably do differently and worth mentioning. The next time I will bake it in two batches, allowing me to roll out the pasta thinner. I felt like I was running out of room on my baking tray so the pasta was a bit thicker than I would have liked it. A thinner sheet will probably make it even feel more "pasta-y". I was afraid that it would taste like very thin shredded scrambled eggs, but whilst it kinda looked like it, it had a bit more of a tug, which I reckon is the fiberhusk and cream cheese working. The following recipe is only for the pasta, but for those interested in what I used for making the sauce it was 1 medium sized onion, diced, 1 bottle of organic pasta sauce (5g carb/100g), 1kg of minced beef, a bit of whipping cream and some spices. I used a pizza slicer to cut the pasta, makes it alot easier than scissors!
LCHF "Pasta"
4 portions
4 eggs (I used large ones)
125g Philadelphia Cream Cheese (not low fat)
1/2 dl fiberhusk (Psyllium husk fibre)
1 pinch of salt
1) Set the oven to 150 C. Beat the eggs until fluffy (I used a hand mixer). Blend in the cream cheese, fiber husk and salt so that it becomes a smooth batter. (I also added some chopped chives. I reckon you can add any number of flavour enhancers like garlic, ground pepper, just up to you to try!) Let sit for a couple of minutes and then mix one more time. (The fiberhusk will make it pretty thick after it's sat a few min, so don't wait too long!)
2) Spread the batter out onto some baking paper (pre-oil it so the pasta doesn't stick). Place on top an oiled piece of baking paper. With a rolling pin, carefully roll out the batter so that it's as thinn as possible. If you get the batter to spread on the whole area it will be thin enough. (In my experience it wasn't, hence my comment above that I'll probably doing it in two batches next time).
3) Bake in the middle of the oven for about 10 minutes. Take off the top paper and then cut the "pasta" into thin slices.
4) Top with your favourite LCHF sauce and enjoy!
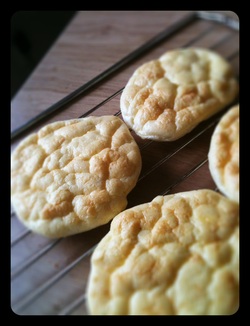 Oopsies straight out of the oven So, you're missing bread. It's understandable. If you've been browsing low carb forums and blogs you're almost bound to have heard of the oopsie. You can do many things with oopsies, use them as a pizza base, as a hamburger bun, you can even use them as part of a dessert by making one large one and using it as a base for a swiss roll. Really, they are THAT versatile. Whilst some may argue that the oopsie roll is the answer to all, that it is not. However, it does make eating low carb easier.The following is the oopsie recipe that I found on the Diet Doctor's Website (it's found closer towards the bottom of the page). The only change that I made to it was add Cream of Tartar, an ingredient that you can't find here in Sweden, but helps when you're whipping egg whites. I've seen it in other oopsie recipes so decided to add it to mine. The results were great. I used it instead of an english muffin to my eggs flourentine today. They're fairly easy to make and are very low carb. I think the next time I make them, they'll be in swiss roll form. Perhaps this evening haha! I'll put a little stevia in it and some shredded coconut, then make some coconut whipped cream and add in some raspberries...yep, I may just have to make that tonight! Oopsies6-8 depending on size3 eggs100g cream cheesea pinch of salt1/8 tsp cream of tartar1/2 tbsp fiberhusk/psyllium husk (can be excluded)1/2 tsp baking powder (can be excluded)1. Separate the eggs, egg whites in one bowl and egg yolks in another.2. Whip the egg whites together with the salt until very stiff. You should be able to turn the bowl over without the egg whites moving.3. Mix the egg yolks and the cream cheese well. Add fiber husk and baking powder if you want (will make the oopsie more like bread).4. Very gently put the egg whites into the yolk mix - try to keep the air in the egg whites. 5. Put 6 large or 8 smalle oopsies on a baking try.6. Bake in the middle of the oven at 150 C (300F) for about 25 minutes - until they turn golden. Can be eaten as bread or used as a hotdog- or hamburger bun. You can also put different kinds of seeds on them before baking them, for instance poppy-, sesame or sunflower seeds. One big oopsie can be used for a swiss roll. Add a generous layer of whipped cream and some berries.
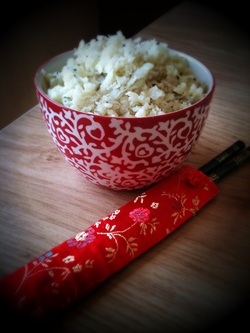 The first time I read about cauliflower "rice" I cringed. It was whilst reading the South Beach Diet book and I just couldn't imagine it tasting any good. A big reason for that was because a few years back, whilst eating at some posh restaurant in Paris, my husband and I were served an amuse-bouche (a pre-appetizer) which was quite frankly, at least to us, disgusting. Perhaps we just didn't have distinguished enough pallets, I dunno...but in any case, it was enough to put me off of cauliflower for a LONG time.
So, back to the South Beach Diet book. I thought that perhaps I would try giving cauliflower another try, but until today, I have put it off. It's a shame I did because actually, I liked this. I was completely surprised that I would and I see numerous possibilities! The following recipe is for a simple version of the dish, however I have seen recipies online that transform this versatile dish to match many other types of cooking: cauliflower paella, risotta, chinese-style fried rice, even rice pudding! So, really the sky's the limit and you can use your imagination to suit this to your own needs. As I experiment with different types of cooking, I'm sure that you'll see cauliflower rice again.
Low Carb Cauliflower "Rice"
2-3 servings
1 medium sized cauliflower head
2 tbsp canola oil
1/4 tsp salt
1/4 tsp ground black pepper
2 tbsp chopped parsley (fresh or frozen)
Directions:
1. Using either a hand grater or a food processor, shred the cauliflower.
2. Heat the oil in a pan. When hot, pour the cauliflower in.
3. Add salt, black pepper and parsley.
3. Sauté for about 4-5 minutes
Serve hot.
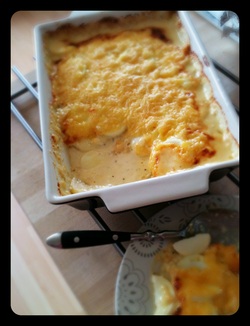 If you've been living low carb for a while, you might be missing potatoes. There is something about potatoes that...I dunno. I thought that I couldn't give them up. One of my favourite potato recipes is potatoes au gratin. But we all know that potatoes are a no-no in the low carb world. But now you can have your cake (or in this case, au gratin) and eat it too! Now, this recipe is a bit different from other au gratin recipes. Not only does it use the very low carb root veg daikon (aka white radish/rättika) instead of potatoes, it also has feta cheese and eggs. Trust me, it tastes good! Can't wait to have it with some steak tonight! This is a great dish to make when inviting friends over or taking something to a potluck and you want to ensure that there's a low carb sidedish that's safe for you to eat.
Potatoes au Gratin à la Nomnomgal
Serves 3-5 people
Ingredients:
500g Daikon, 2-3 mm thick. (I used a mandolin to slice them evenly. In the picture above, I used about 525g.)
4 garlic cloves, pressed
1 medium sized yellow onion, diced
salt
ground pepper
400 ml heavy whipping cream (35-40%)
3 eggs, sliced
200g feta cheese (crumbled into small pieces)
150g shredded gratäng cheese (any cheese that melts well, and that you would normally use to top an au gratin recipe will do.
Directions
1. Sweat the garlic and onion in a deep frying pan with some butter/ghee with a little salt. Make sure they don't brown.
2. Add the daikon, whipping cream and salt and pepper to taste. (I put a bit less salt as the feta is fairly salty.)
3. Bring mixture to a boil and then lower the heat to medium. Cook uncovered for 15-20 minutes, stirring every so often so as to avoid a crust forming at the top.
4. Set oven to 225 degrees C.
5. Add the crumbled feta to the mixture. Mix so that the feta is spread evenly throughout the pan.
6. Poor the mixture into an oven proof dish.
7. Layer the sliced eggs over the mixture.
8. Sprinkle the shredded cheese on top and place into the oven for around 20 minutes.
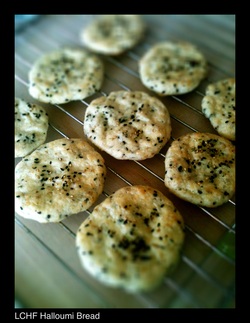 Today I purchased a new cookbook called " LCHF för Familjen" which translates in English to "LCHF for the Family". I was actually in the bookstore to pick up a LCHF baking cookbook but ended up leaving with this one because it seemed to have recipes that were relevant to my lifestyle. I wanted recipes that weren't so far off with what I am likely to make on a daily basis, and I liked the idea of getting my daughter accustomed to not eating excessive carbs. I have had a block of halloumi cheese sitting in my fridge forever so I thought that this would be a good recipe to try. I deviated from the original recipe with the use of sesame seeds. The original recipe calls for white sesame seeds. I didn't have any, I only had furikaki on hand (a Japanese condiment designed to sprinkle on rice). My furikaki had black and white sesame seeds, seaweed and red shiso leaves. The seaweed gave it a bit of a fishy taste, making this good to go with the salmon that I was preparing for dinner. The following is the recipe in Swedish and then my English translation. My verdict? It's not very "breadlike" but that may be because I was really expecting it too be. It does seem like a decent side dish however, kinda like a chewy pancake. I can imagine it to be good as an appetizer. Perhaps topped with some smoked salmon and some sort of mayonaise based sauce with a sprig chive to dress it up. Halloumi Bread10-12 pieces 25g smör/butter200g halloumi3 äggvitor/egg whites1/2 krm/pinch salt1 1/2 msk/tbsp fiberhusk/psyllium husk 2 msk/tbsp sesamfrön/sesame seeds + lite till garnering/extra to sprinkle1/2 dl (50 ml) grädde/creamGör så här/Directions- Sätt ugen på 200 grader. Lägg bakplåtspapper på en plåt. Smält smöret och låt svalna. Riv halloumin. / Set the oven to 200 degrees C. Place baking paper on a baking tray. Melt the butter and let it cool. Shred the halloumi.
- Vispa äggvitorna med saltet till ett hårt skum och rör ner den rivna osten, fiberhusk och sesamfrön i äggskummet. Ha i grädde och smör. Blanda väl och låt svälla några minuter. / Beat the egg whites with the salt to a hard foam and blend in the shredded cheese, psyllium husk and sesame seeds into the egg foam. Add the cream and butter. Blend well and allow it to swell for a few minutes.
- Lägg matskedsstora klickar på plåten. Bred ut dem lite med en sked och strö över lite sesamfrö. Grädda mitt i ugnen i cirka 15 minuter. Låt svalna på galler. / Spoon tablespoon sized clicks on the baking tray. Spred them out a bit with a spoon and sprinkle over a little sesame seed. Bake in the middle of the oven for about 15 minutes. Allow to cool on a baking rack.
Tips! Frys in de bröd som inte går åt. Bröden blir bäst av att tinas i brödrost eller ugn. Då blir de som nybakade!/ Tip: Freeze the bread that you don't eat. The bread is best thawed in the toaster or oven. It'll taste just baked!
Hi there! I wanna share with you a recipe that I'm DYING to try! I thought that I'd forever have to give up stuff like bisquits, until whilst browsing in bed on my iPhone last night looking up LCHF recipes, I came across this one. I got it from Get Fit Katie's Low Carb Blog. You can visit it at that link to see the original recipe plus find any others that you think may be interesting. I am going to post another one right after this, also taken from her blog. I believe that we bloggers need to stick together and support each other. How else are we gonna reach our goals right? Anywho, the following is the recipe. Can't wait till I get the coconut flour that I ordered from Bodystore.com (A Swedish online health food/supplement store). It's not so cheap (165 SEK/kg = approx. 24 USD/kg) but whilst I'm trying to make the transition to LCHF and also enjoy the food, I'm willing to pay the extra. Afterall, I am a food lover! LCHF Buttery Garlic and Sharp Cheddar Biscuits (Taken from Get Fit Katie's Blog) Ingredients - ¼ cup butter, melted and slightly cooled
- 1/3 cup sifted Coconut Flour
- 4 eggs
- ¼ teaspoon salt
- ¼ teaspoon garlic powder
- ¼ teaspoon baking powder
- 1 cup sharp cheddar cheese, shredded
Directions - Preheat oven to 400 degrees.
- Line a cookie sheet with foil, and grease.
- Whisk together eggs, butter, salt, and garlic powder.
- Add coconut flour and baking powder and whisk until there are no lumps.
- Fold in cheese.
- Drop batter by the 2 oz scoop onto greased cookie sheet.
- Bake for 15 minutes, or until lightly browned.
- Let cool in pan for 5-10 minutes before removing and serving. Make sure that biscuits are completely cool before storage or they won't stay crisp!
 LCHF Cheesy Garlic Biscuits UPDATE: Made them!
These were pretty good. I made them in a 12 cupcake tin. I got 7 biscuits out of them. I added a little bit more cheese on top to make them look cheesy. There was a slight coconuty taste, but ever so slight. That said, it may be because I didn't use sharp cheddar, but rather regular cheddar, so that may impact on the taste.
I also didn't take the advice of Katie and put them into cupcake forms prior to putting them into the tin. I did butter them, one of the biscuits came out problem free but the rest had a bit left at the bottom. So my opinion is to butter them even more liberally or use muffin cases.
I used 1/2 tsp of garlic powder instead of the 1/4. It didn't seem to make a big difference, the garlic taste wasn't a major player. I must say though that I will likely make these again, especially if we have guests over.
|
 RSS Feed